By Blake Harper 23 June 2025
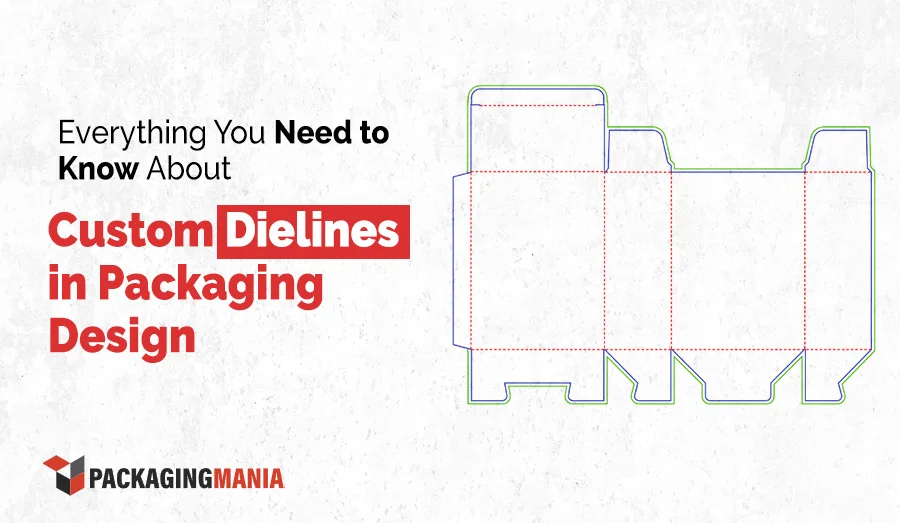
A lot goes into creating the perfect custom box for a product. There are many factors to consider, like size & shape, materials, printing, and finishing. However, there is one thing that sits at the heart of all these factors, and that is a dieline. Simply put, a dieline is like a blueprint for designing custom boxes of all types. Whether you are looking for cardboard, Kraft, rigid, or corrugated boxes, paper bags, labels, or stickers, dielines are a must. Precise dielines help you avoid costly packaging and printing errors and always ensure that you get 100% accurate custom product boxes for your brand. If you want to acquaint yourself with dielines used in the realm of custom boxes, then you are at the right place. In this well-detailed blog, we will explain everything you need to know about dielines. Join us as we walk you through all the major aspects of dielines used in the printing industry.
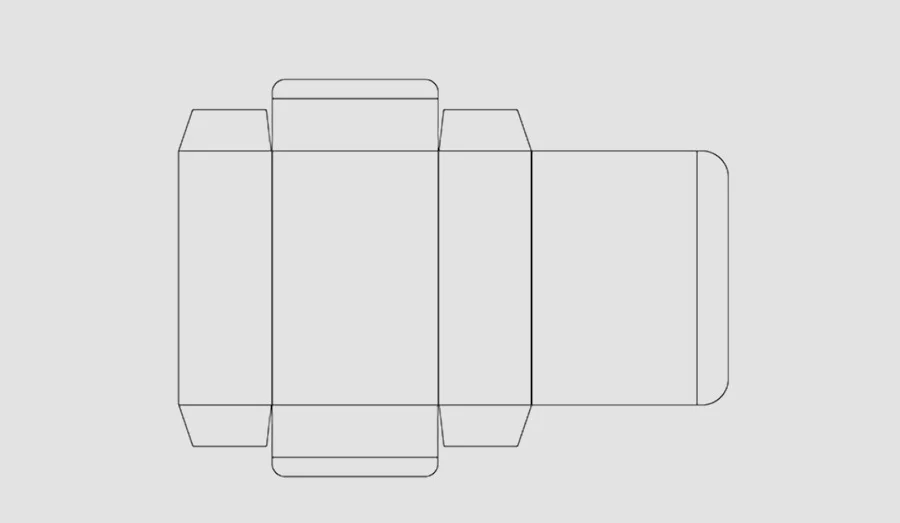
We have already briefly explained what a dieline is. Now let’s check it out in more detail and look at its major elements. A dieline, also sometimes known as a die line, is a layout for a custom box. It contains the exact dimensions (size, shape, and style) of a printed box before it is sent for cutting and folding. Imagine it as a map for a building. If anything in the map is wrong, the whole structure will be flawed. Similarly, if there are issues with the dieline, the boxes will not be produced as required. Now that you have a detailed understanding of a dieline, let’s check out its components.
All of these elements come together to create the perfect layout of a custom box. When a designer achieves perfection in dielines, it has both instant and long-term benefits for brands. In the short term, the boxes are created exactly as imagined and as per the need of the products. This helps make your products stand out and have an outlook better than the competitors. Overall, it creates a lasting first impression on buyers that leads to an increase in sales. In the long run, it sets the tone for repeat orders. You can just provide the dielines to your custom packaging supplier, and they’ll print it without requiring any revisions. It can also lead to optimizing materials usage, production time, and cost.
For a beginner, creating outlines might look too hard and challenging. However, this is not the case if you spend some time on it and have a practical guide with you. Luckily, we are here to help you with the guide part. After some practice and mistakes, you will be able to create dielines for your product boxes. Even if you don’t, we are here to help. You can utilize our free design support, and we will do the needful for you. For now, let’s learn the process with our step-by-step approach.
First of all, you will need graphic design software to create a dieline. There are plenty of them available in downloaded and online form as well. We suggest you use a paid version to access all the available features. You must create the dieline in a vector format, as it provides numerical values for lines and curves in the design. It helps greatly when it comes to cutting the material during the die-cutting process. Before sending out the dieline template to your packaging supplier, ask them about which format they accept. Save the file in that particular format and then share. For example, we accept design files in Adobe Illustrator (.AI, .EPS) and PDF (high-resolution, vector-based).
After selecting a design software, you have to pick the correct paper size. For this purpose, you will need to know the exact dimensions of your product, which you can get by measuring its length, width, and height. You also need to take into account the box style here as well. For example, if you are creating dielines for tuck boxes, check out their shape before moving ahead.
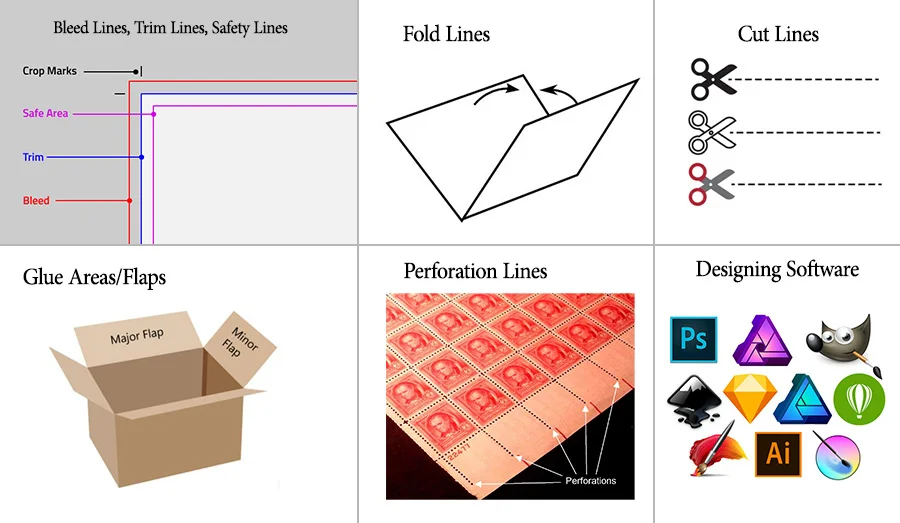
Now this is the most important part in the entire process. We have already explained the common elements of the dieline. The most important lines to include in the design are cut, fold, bleed, and safety. If these lines are not included, your design can have flaws, which can cost hugely and lead to printing mistakes. Please keep in mind that these lines must be placed correctly as per your design. Wrongly placed fold or cut lines can lead to mistakes in the final version of die cut boxes, which can cost you dearly. Such errors usually result in assembly problems or make the products hard to fit.
After you have added the lines mentioned above, add safety zones or lines. They are actually a margin that ensures the essential information is not exposed to blades during the die cutting process. We suggest you use them to safeguard texts, logos, images, graphics, and other relevant elements. While adding safety lines, don’t forget to include a gap of at least 5 mm from the cut lines to the safety zone so you don’t end up with wrongly cut boxes.
Now that you are done with all the basic parts of the dieline process, it is time to add design elements to the blueprint. You can add literally anything you want as long as it is ethical and permitted by the local laws in your state. One important thing to mention here is to keep the position of flaps in your mind. For example, reverse tuck boxes have flaps different than straight tuck end boxes. So, a design meant for one of them will not work on the other. Similarly, if you are working on custom window boxes, make sure that no part of the design is cut by the window, unless you want it deliberately. Many die line templates also include elements like slots, tabs, perforations, or tear-away points. Make them with symbols to help printers identify them. With the help of these elements, you can ensure that your dieline has no faults.
Before sharing the dieline with your packaging supplier, it is important to review it and ensure that you have included all the essential parts in it. Check that all the dielines are correctly scaled, aligned properly, and everything is well-accounted for. If you aren’t sure about your dieline, convey your concerns to the concerned team at your base. They’ll sort out everything before sending the design to the production department.
Although many packaging suppliers like Packaging Mania offer free dieline templates, it is important that you learn it yourself. For creating precise dielines, you have to rely on design software. Luckily, there are many options in that regard. Some of them are given below.
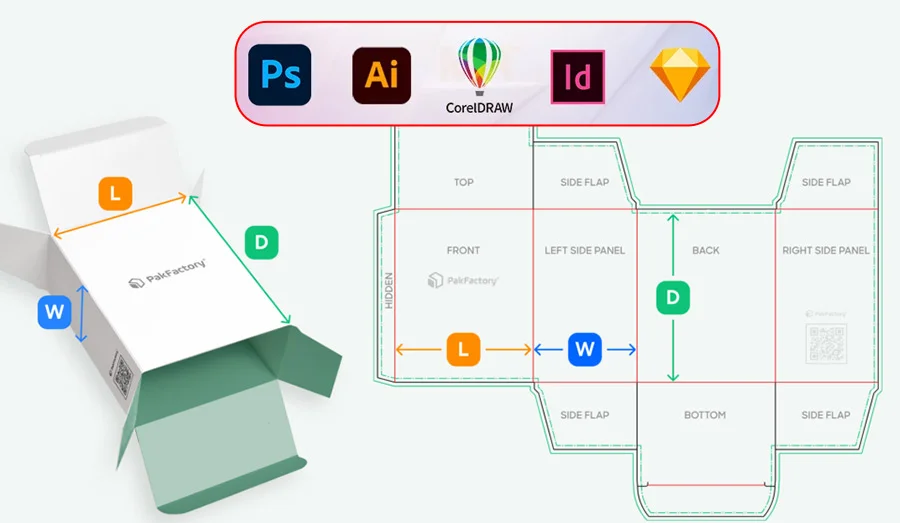
The above tools can be used for creating dielines for templates for the different types of packaging, including tuck end boxes, shipping boxes, mylar bags, or others.
The success of your dielines depends on various factors that you need to consider before preparing a dieline. These factors are explained below.
The size of the product is the central factor in deciding the size of the box and thus plays a vital role before designing the dieline. You can’t always manage the same size of the product in the dieline; this is why you have to scale it up. While creating a dieline in exact size is possible for small products, it is not for large ones like big electronics or for shipping boxes. Hence, you will need to scale up the dieline, and don’t forget to mention this information to your packaging supplier.
The type of paper you must use for your custom product boxes depends directly on the weight of the product. For heavier products or for shipping purposes, corrugated cardboard is the best option. For lightweight items, Kraft and cardboard boxes are excellent, as they are a cost-effective option. The type of material directly affects the type of dieline you create, so keep this in mind as well.
If you deal only in shipping boxes, you need to add additional flaps or adhesive spots to your packaging dieline. This will ensure that the box reaches its destination safely. You might also want to add a few millimeters of extra space for bubble wrap, packaging peanuts, or foam inserts to keep the shipping box safe.
These things may not be required when it comes to dielines of custom retail boxes. In retail, the box must make an excellent first impression that can help you get the attention of buyers instantly.
While researching dieline templates, you will come across these three terms frequently. In order not to get confused, it is better to grab a basic understanding of all of them. Let’s check them out.
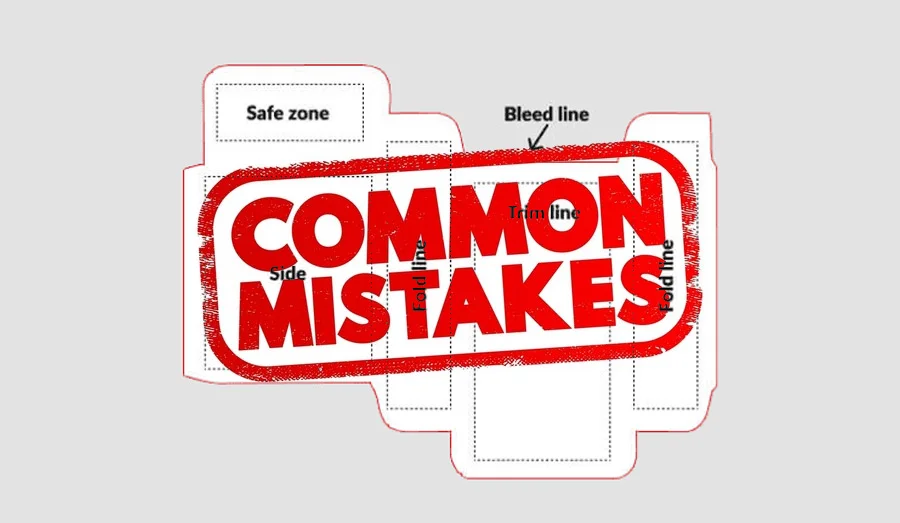
Even after practicing for quite some time, you might not be able to create dielines correctly. Our expert designers have identified some of the common mistakes that most of the brands make while submitting their dielines. Let’s mention them so you don’t repeat them in your files.
We have explained almost everything a brand or designer should know about dielines and hope that it will be easier for you to create one for your custom boxes. These lines control the entire printing and packaging process, so everything about them must be picture-perfect. All the lines (cut, fold, bleed, trim, and safety), scaling, artwork placement, and file format must be 100% accurate if you want to get high-quality boxes. If you think that you can’t manage all of this, there is nothing to worry about. Many brands, including startups and established ones, ask us to create their box dieline for them, and they don’t even have to pay a single cent for it. You can also get our services by simply contacting us through our live chat or ringing us at the provided numbers.
16 July 2025


28 June 2025

Blake Harper is an experienced and dedicated packaging engineer with a deep passion for creating innovative, sustainable, and cost-effective packaging solutions. He holds a degree in Packaging Engineering, where he gained a strong foundation in materials science, product design, and manufacturing processes.